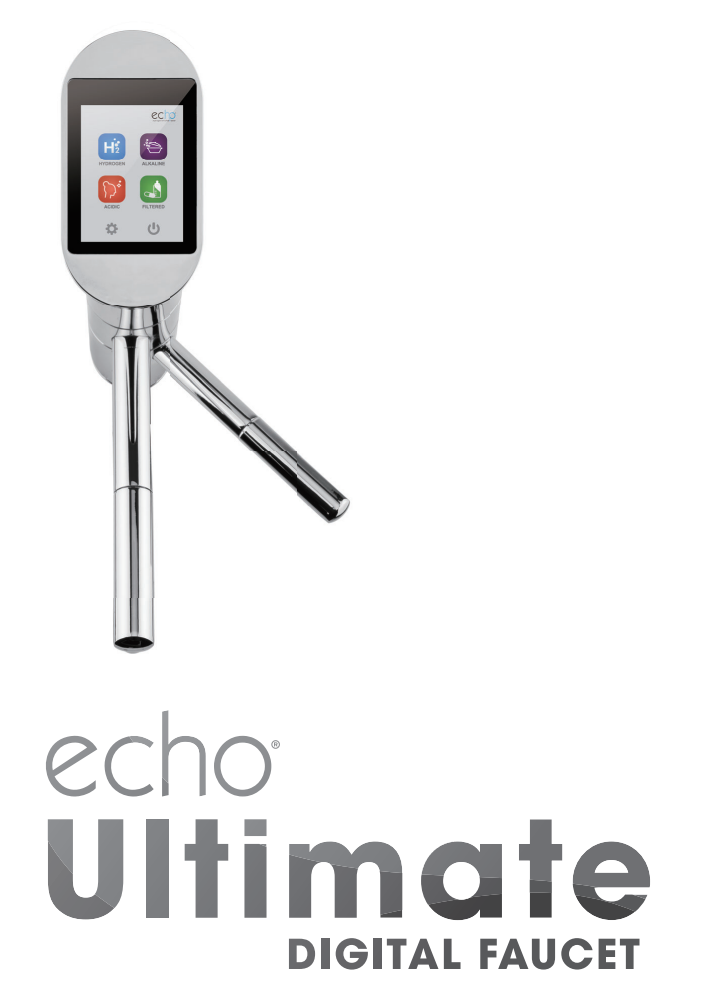
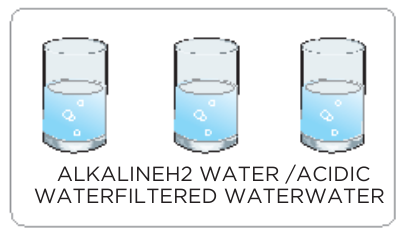
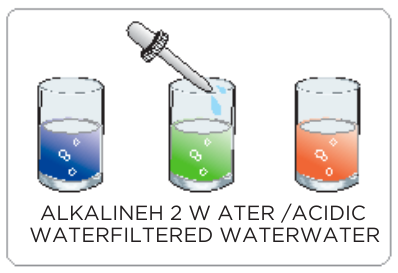
The Echo Ultimate™ Hydrogen Water Machine is the only machine in the world that can produce four different types of water making it the most advanced hydrogen water machine available. It offers a versatile solution for your water needs: hydrogen, alkaline, acidic, and filtered. Ideal for health, cleaning, and skincare, it's a perfect fit for any home with easy installation options and a 10-year warranty.
-
Acidic Water - Acidic water is an incredible natural surface cleaner. When used in your skincare routine, it can help with acne, psoriasis, eczema and other skin conditions. It can also help get rid of tonsil stones, gingivitis, and mouth bacteria. Acid water can even help plants grow better by lowering soil ph. Do not drink acidic water. The Echo Ultimate includes up to 4 levels of Acidic water which incrementally increases the acidity of the water.
- Level 1: For facial cleaning, oral hygiene, mouthwash, or irrigating plants and flowers.
- Level 2: For skin care, oral hygiene, gargling, washing your hair, or as an astringent.
- Level 3: For cleaning, such as around the kitchen.
- Level 4: For sterilization, such as cleaning fresh produce, meat, fish, and poultry.
-
Alkaline Water - Alkaline water is a powerful cleaning agent. Use it for cleaning vegetables or counters – the higher the pH, the better the cleaning properties. The Echo Ultimate includes up to 4 levels of Alkaline water which incrementally increases the pH of the water. You should never drink alkaline water beyond a level 2 and strongly encourage you to ask your physician before consumption.
What's Included
- Echo Ultimate Machine
- Echo Ultimate Accessories Box: Water Spout, Elbow, Teflon Tape, Diverter Valve, Manual, 1.4 in. Water Outlet Hose, Dust Pre-Filter, Color Chart, pH Test Kit
- AC Power Cord
- Instruction Video
- Product Manual
Specifications
PRODUCT SPECIFICATIONS
| Product Manufacture Permission Number |
No. 610 by KFDA (Ministry of Food and Drug Safety) |
| Feature |
Hydrogen/Ion Water Generator |
| Model |
Echo Ultimate |
| INPUT Voltage |
AC 110V ~ 240V, 50Hz~60Hz |
| Power Supply |
SMPS |
| Power Consumption |
Max 420W |
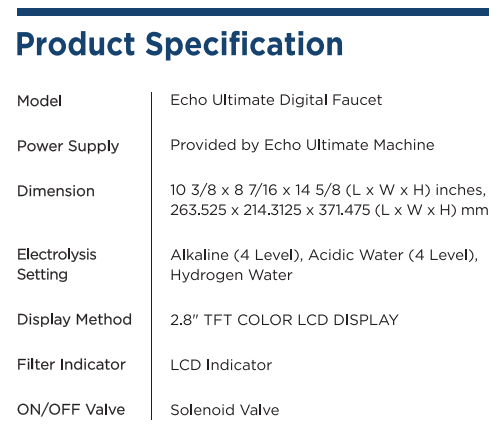
| Overall Dimension |
10 3/8 x 8 7/16 x 14 5/8 (L x W x H) inches,
263.525 X 214.3125 X 371.475 (L x W x H) mm
|
| Applicable Water Inflow Pressure |
10-71psi / 0.7-5Kgf/㎠ |
| Applicable Water Temperature |
41-86℉ / 5℃-29℃ |
| Unit Operation Type |
One Touch Automated Start |
| Electrolysis Method |
Continuous Electrolysis / Proprietary Hydrogen Module |
| Electrodes in Alkaline/ Acid (Chamber) |
5 Layers of Platinum Over Titanium, 9 Electrodes |
| Electrodes in Hydrogen Module |
2 Electrodes Platinum Coated |
| Electrolysis Capacity |
DARC system (3.5L/min. at 49.8 psi) |
| Electrolysis Setting |
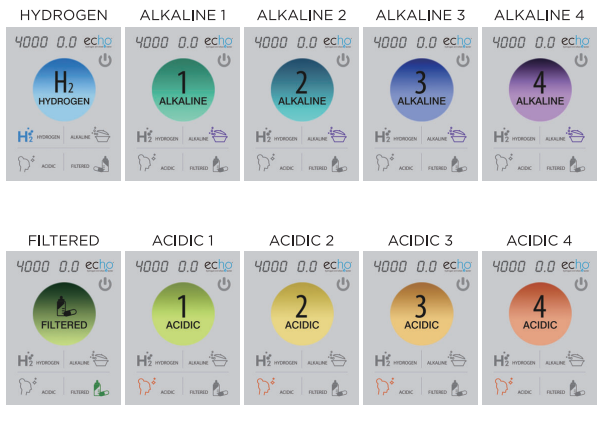
H2 Water / Alkaline (4 levels) / Acidic (4 levels) |
| Automatic Cleaning |
Patented Anti-Sealing Technology
Reverse Polarity Every Use.
|
| pH Value |
pH 4.0(±0.5)-11.5(±0.5) |
| Filter Replacement |
Easily Replaceable Cartridge |
| Filter Composition |
Activated Carbon, KDF55, Tourmaline |
| Filter Life |
1056 gal./4000L |
| Filter Life Indicator |
LCD Graphic Display, Voice Prompt |
Features
-
Hydrogen-Enriched Water Production:
- The Echo H2 Machine is designed to create hydrogen-enriched water, providing superior hydration and overall wellness benefits.
-
Balanced pH Levels:
- This advanced machine enriches your water with hydrogen while maintaining a neutral pH level.
-
Dual Water Streams:
- With its dual functionality, the Echo H2 Machine processes two separate streams, isolating hydrogen gas and producing a refreshing, hydrogen-infused drink.
-
Enhanced Oxidation-Reduction Potential (ORP):
- Enjoy the benefits of an ORP ranging from -400mv to -500mv, essential for gut health, promoting beneficial bacteria, and boosting the immune system.
-
Flexible Installation Options:
- The Echo H2 Machine offers versatile installation options, allowing you to place it on your countertop or under your sink without compromising on style or functionality.
-
Echo H2 Faucet Compatibility:
- For under-sink setups, pair the machine with the Echo H2 Faucet, a sleek accessory designed to dispense fresh, hydrogen-enriched water.
-
Compact and Lightweight Design:
- The Echo H2 Machine boasts a compact, lightweight design that fits effortlessly into any kitchen.
-
Variety of Faucet Finishes:
- Choose from a selection of stylish finishes for the Echo H2 Faucet to match your kitchen decor, including Chrome, Stainless Steel, Oil Rubbed Bronze, and Black.
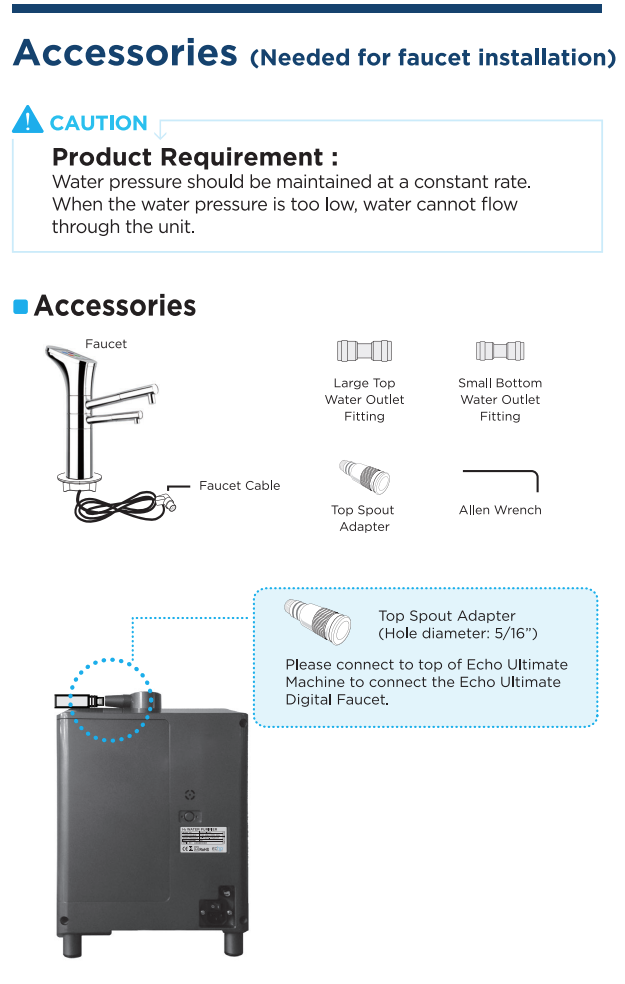
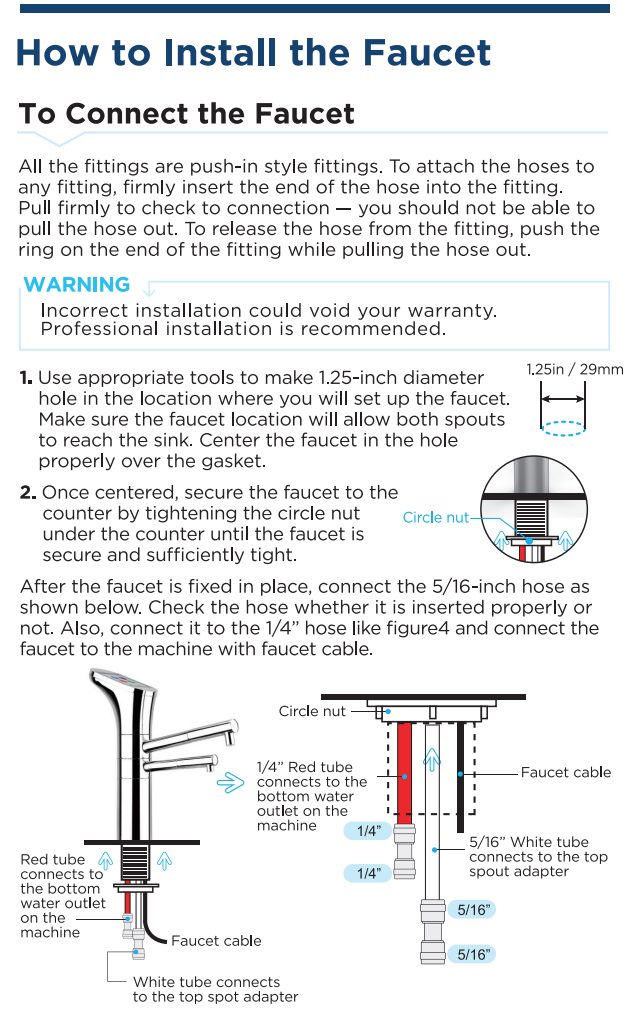
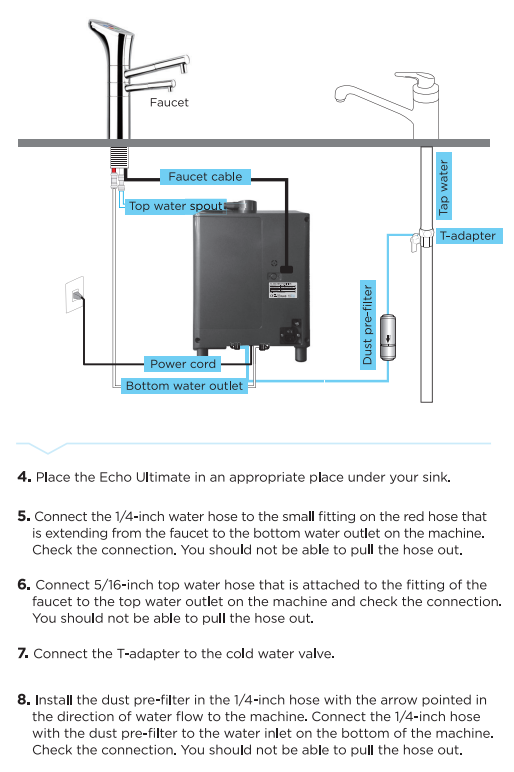
Installation instructions
COUNTERTOP INSTALLATION INSTRUCTIONS
Connecting to a Standard Faucet - The machine is on the counter.
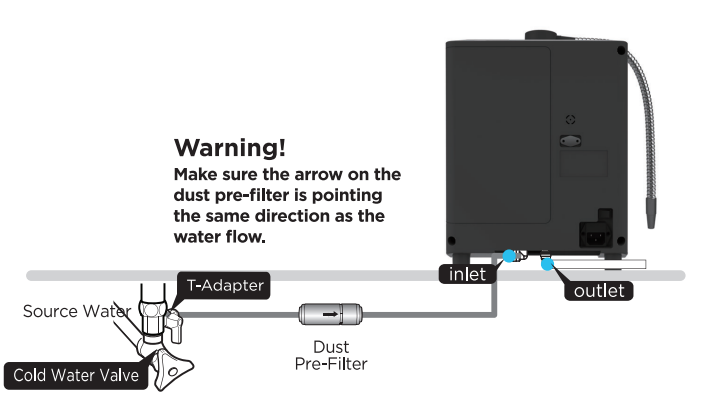
WARNING!
Make sure the arrow on the dust pre-filter is pointing in the same direction as the water flow.
 Before installing, shut off the water supply.
|

Step One
Remove the aerator from the faucet. Attach diverter valve. Use sizing rings and grommets if needed.
|
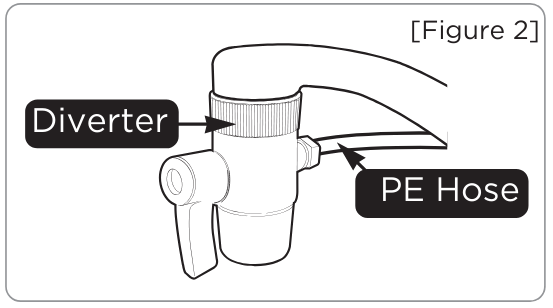
Step Two
Connect 1/4 in. (PE) hose to the diverter in "Figure 2."
|
|
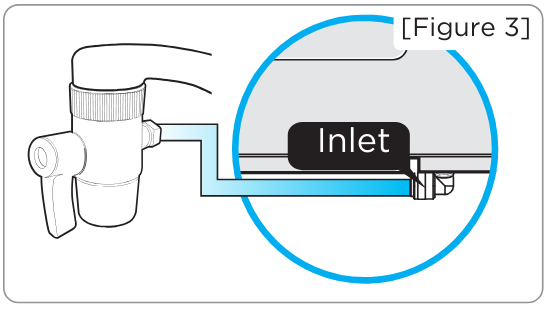
Step Three
Push the 1/4 in. (PE) hose all the way into the water inlet at the bottom of the machine.
|
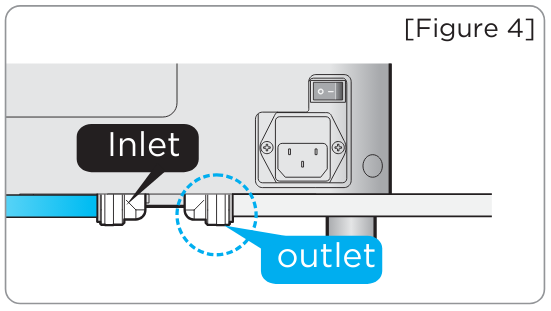
Step Four
Connect the stainless steel acid line to the acidic outlet and allow it to drain into your sink.
|
|
Step Five
After finishing the connection of "Figure 4," open the water supply valve and adjust the water pressure.
|
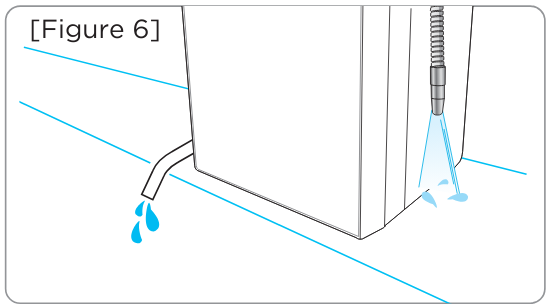
Step Six
Check for leaks on all connections after installation is complete.
|
Connecting to a Cold Water Valve under the sink - The machine is on the counter.
WARNING!
Make sure the arrow on the dust pre-filter is pointing in the same direction as the water flow.
Before installing, shut off the water supply.
|

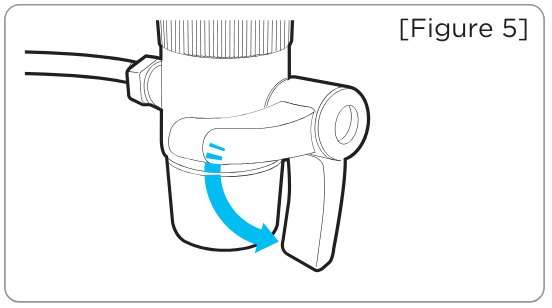
Step One
Loosen the nut of the cold water valve.
|
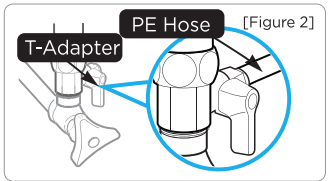
Step Two
Connect 1/4 in. (PE) hose to the t-adapter in "Figure 2."
|
|
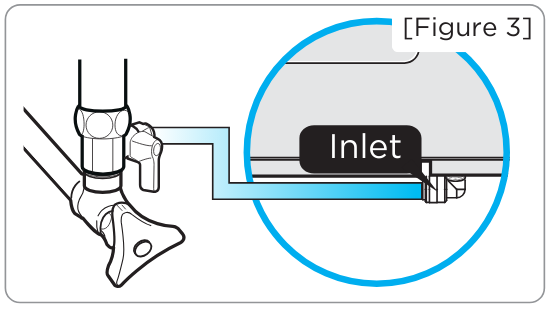
Step Three
Push the 1/4-inch (PE) hose all the way into the water inlet at the bottom of the machine.
|
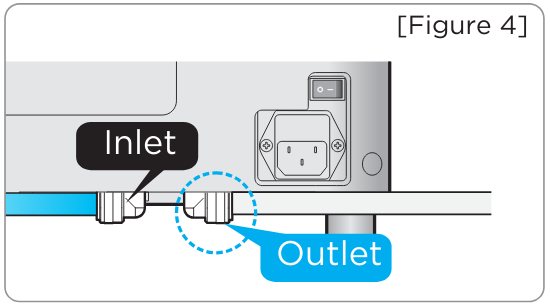
Step Four
Connect stainless steel acid line to the acidic outlet and allow to drain into your sink
|
|
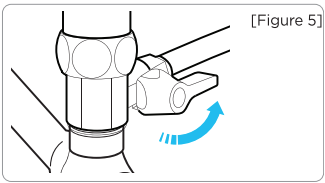
Step Five
After finishing the connection of figure 4, open the water supply valve and adjust the water pressure.
|
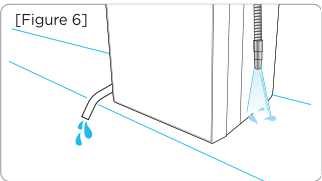
Step Six
Check for leaks on all connections after installation is complete.
|
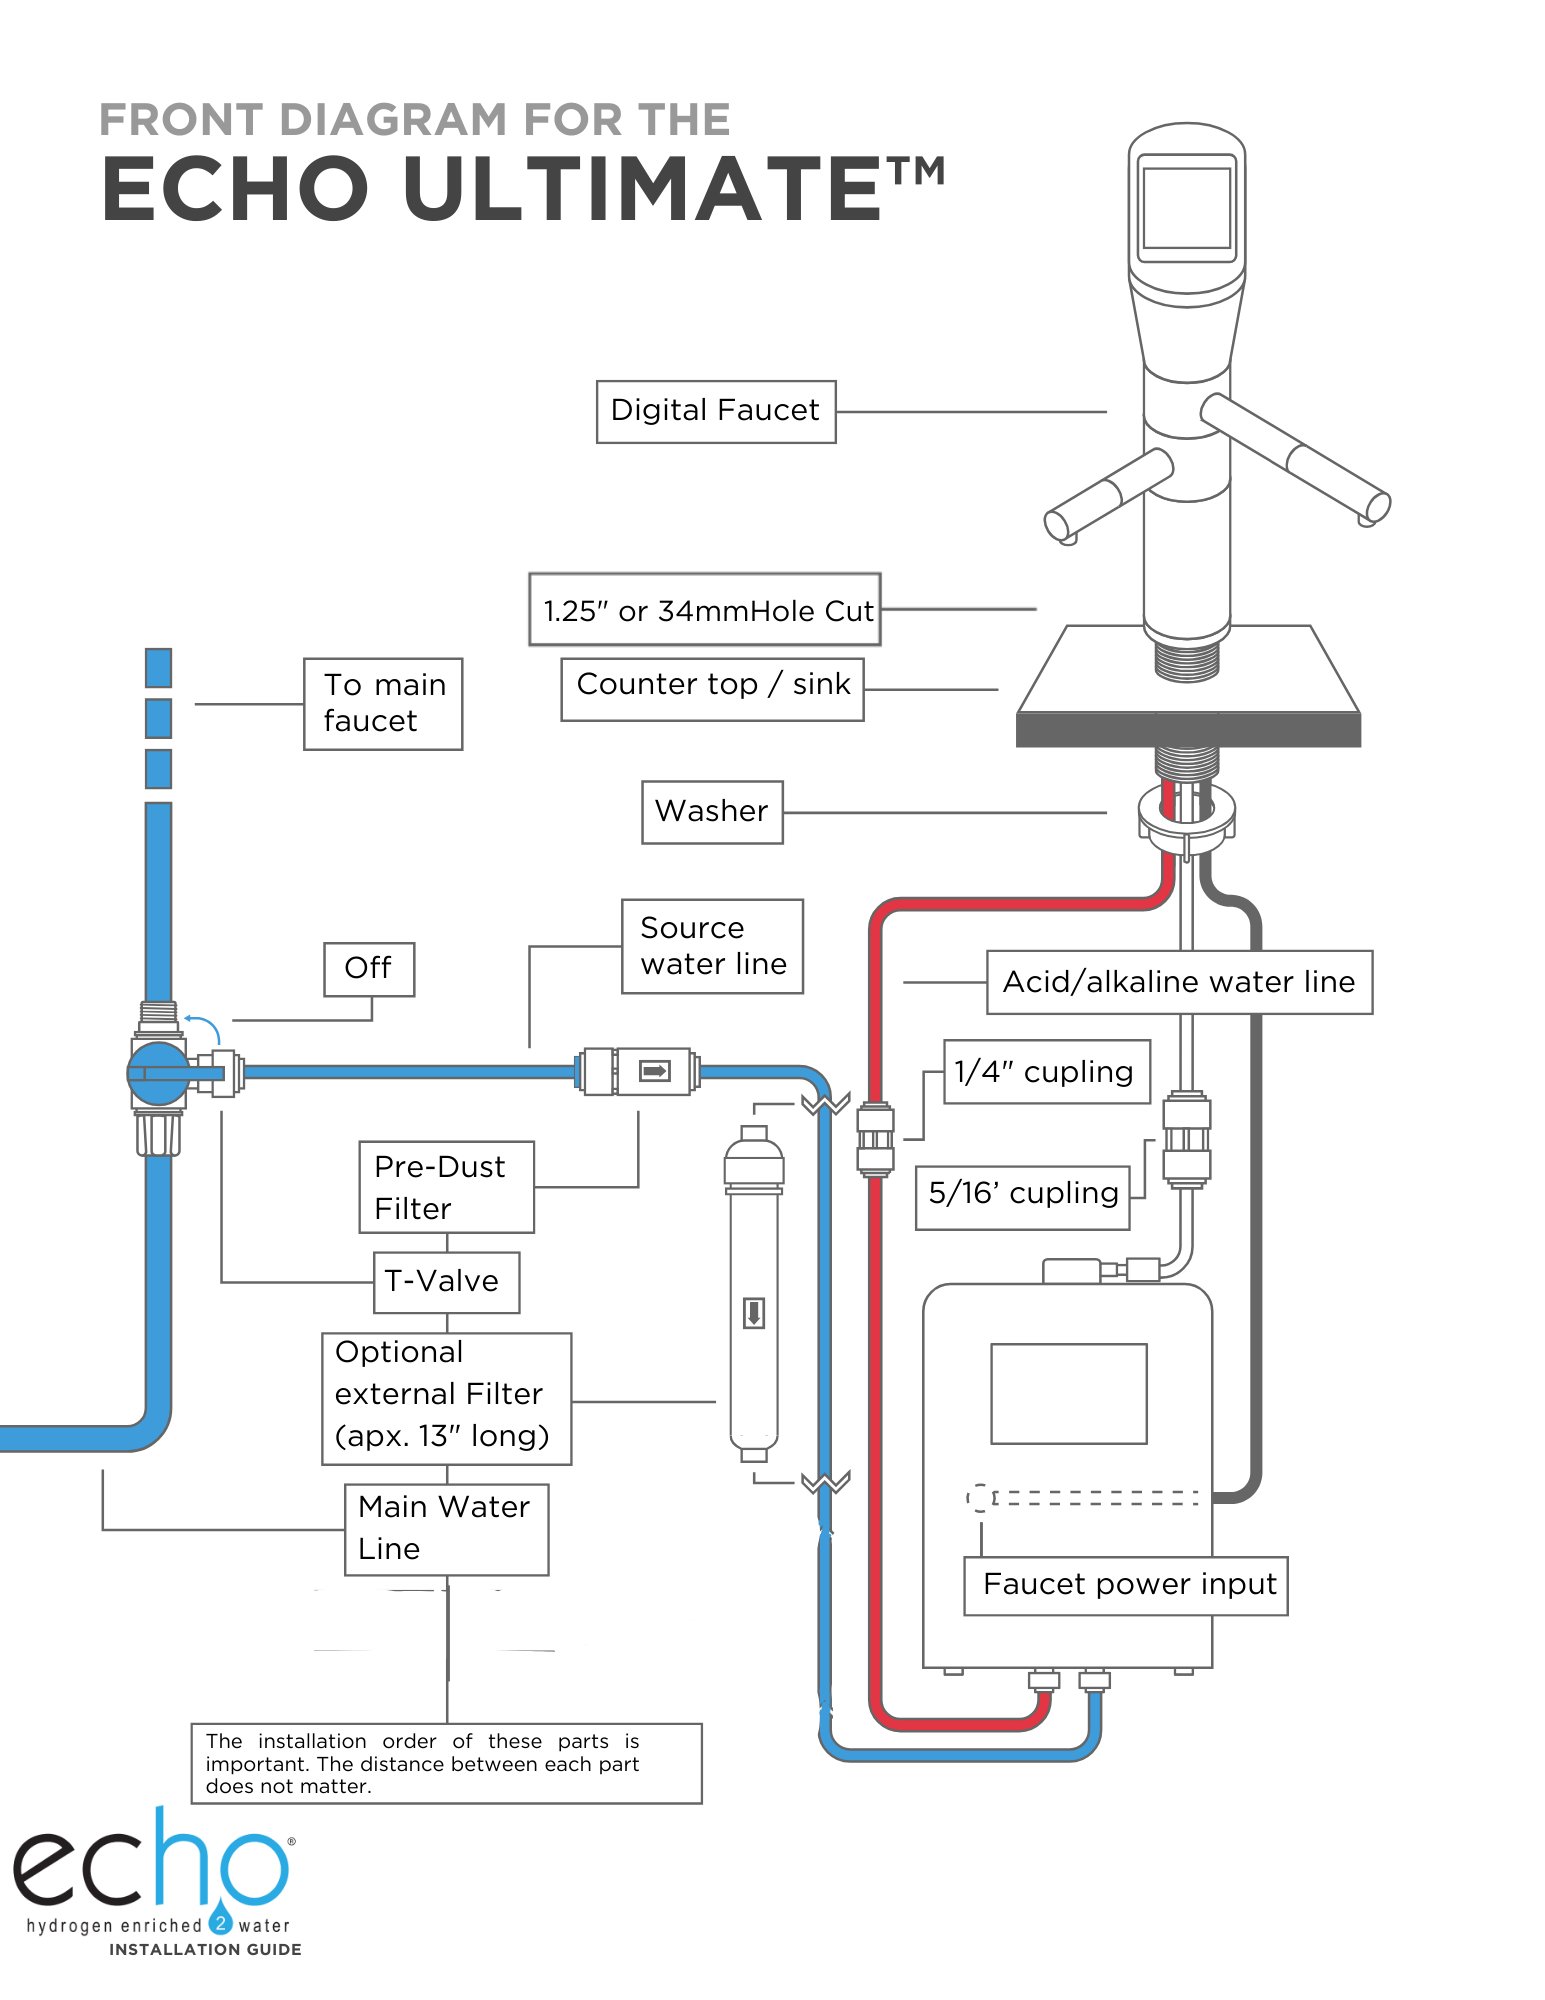
UNDER THE COUNTER INSTALLATION INSTRUCTIONS
Connecting to a Cold Water Valve Under the Sink - The Machine is under the counter.
Moving your Ultimate Machine from Countertop to under the counter.
If you currently have your Ultimate on the counter, you can easily install it underneath the counter
- Purchase: An Echo Faucet and Angle stop t-valve (3/8" x 3/8" x 1/4")
A

Names And Functions
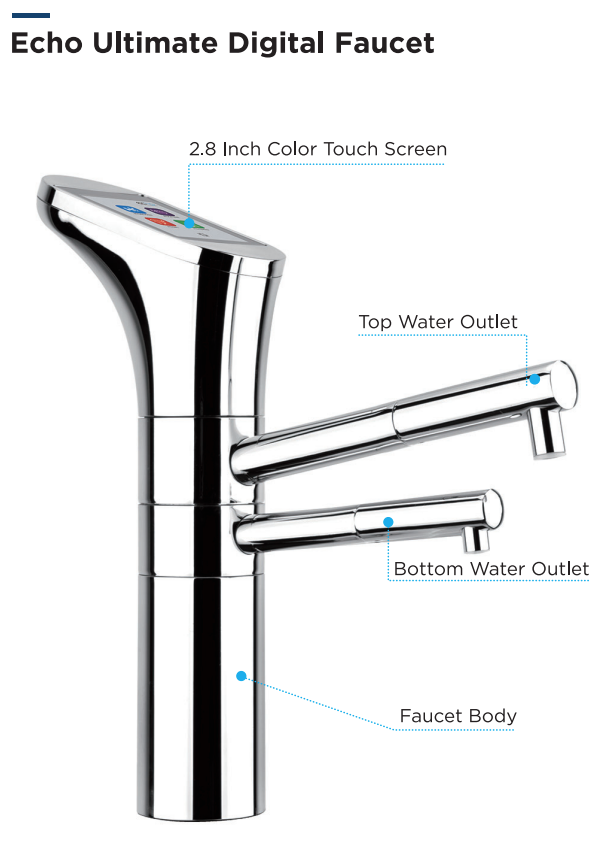
Front Side
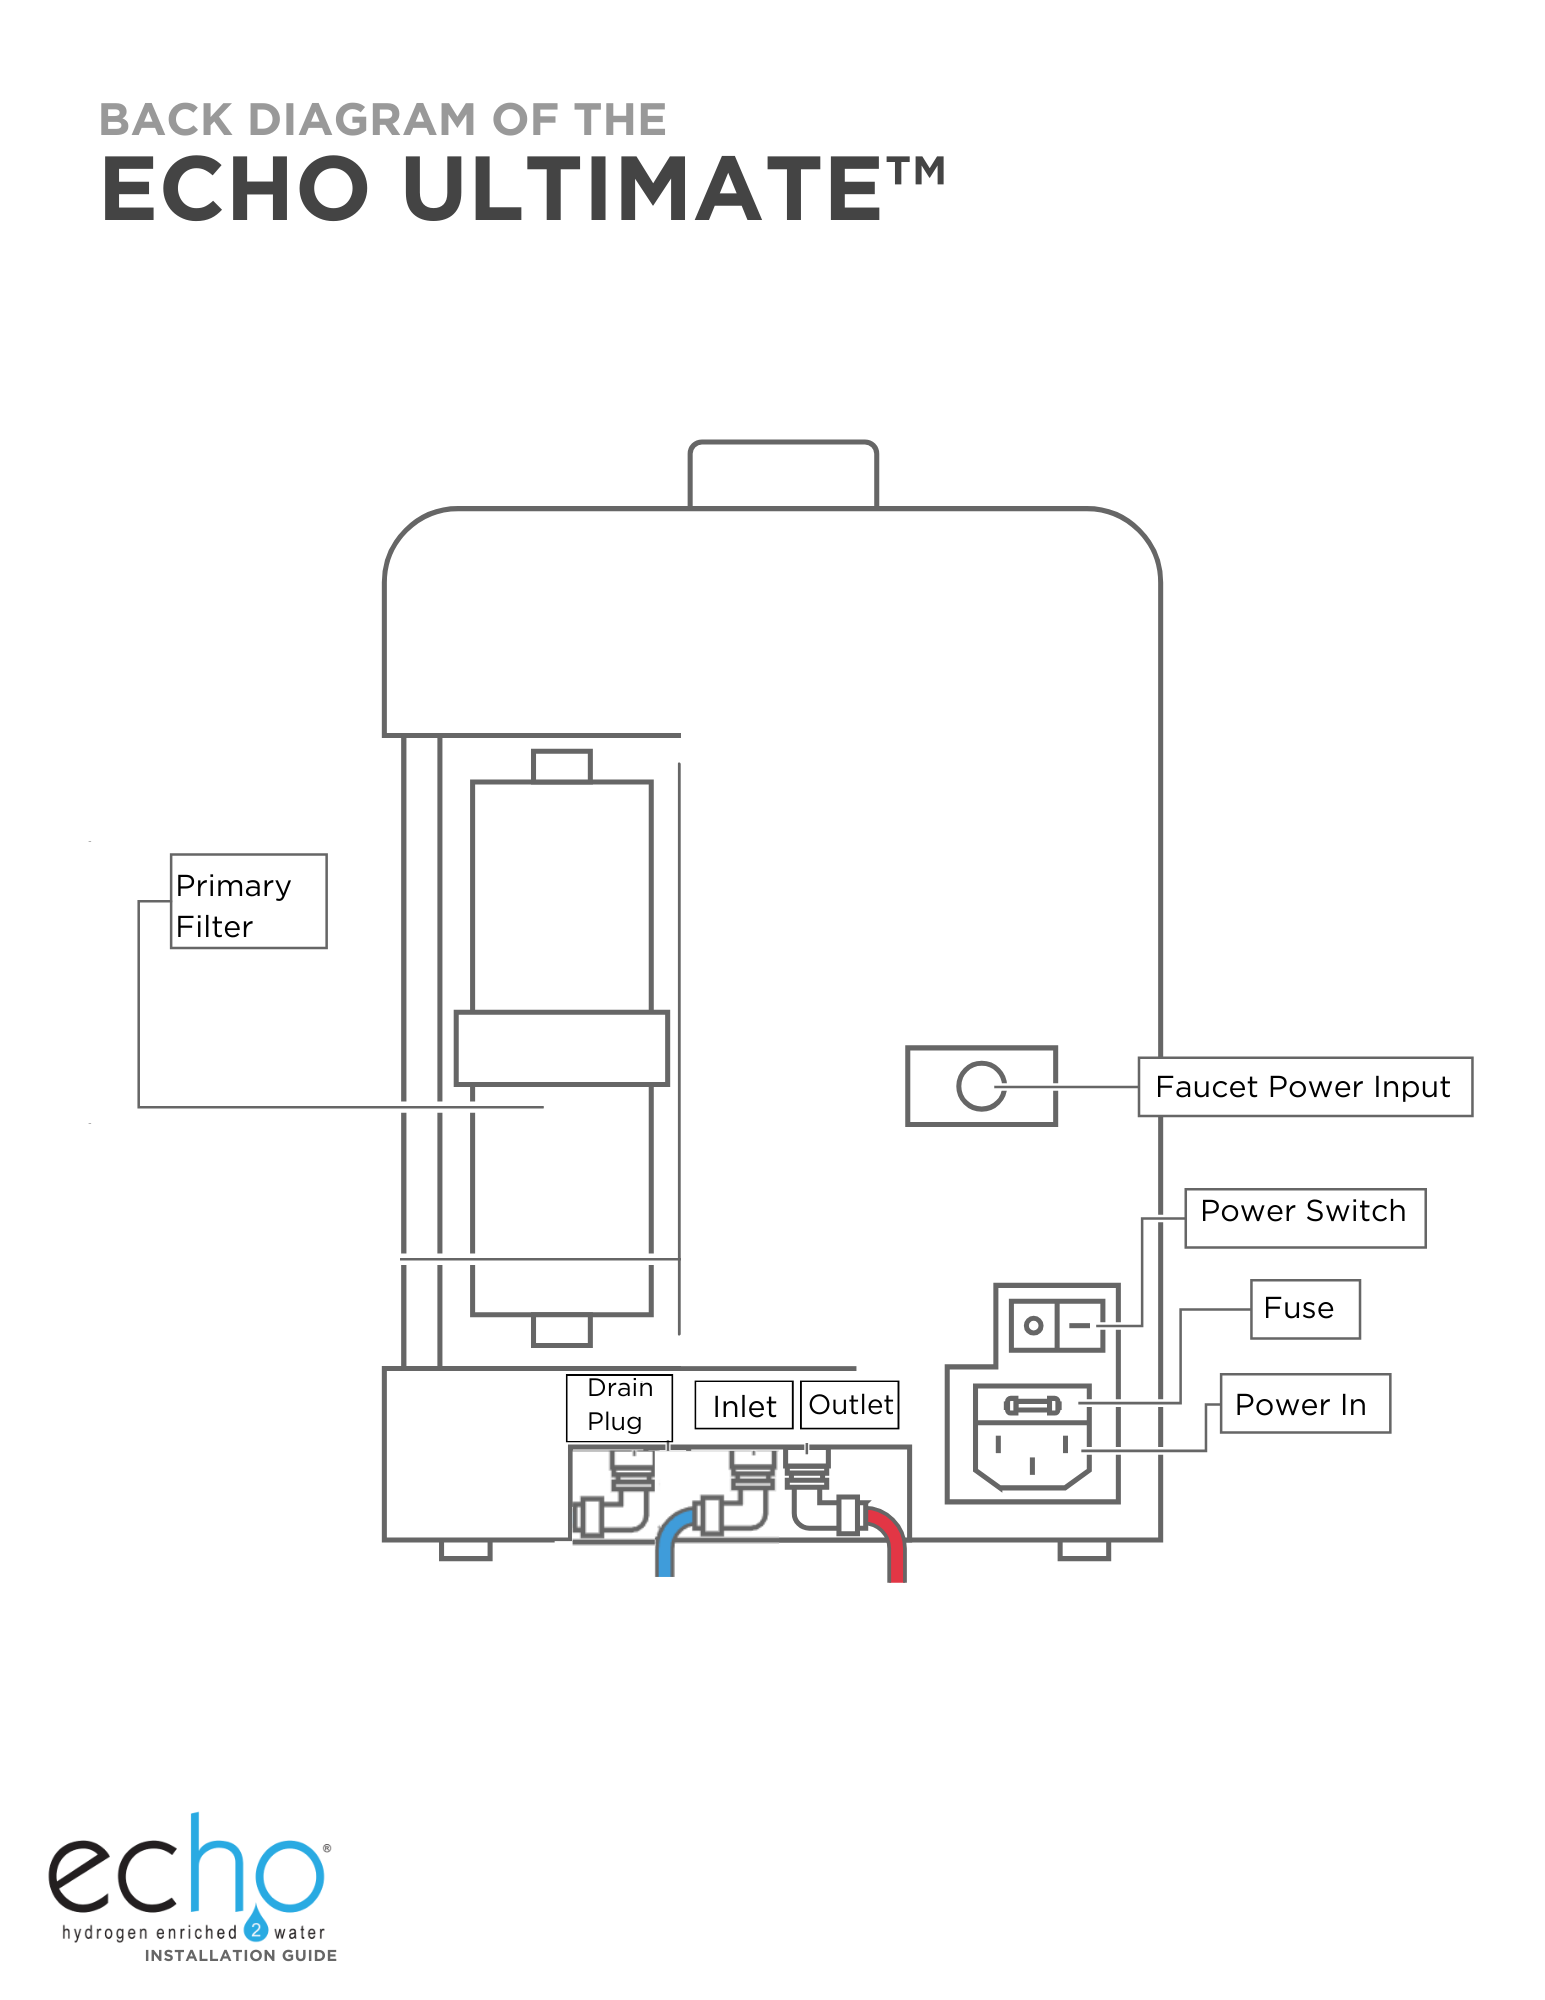
Back Side
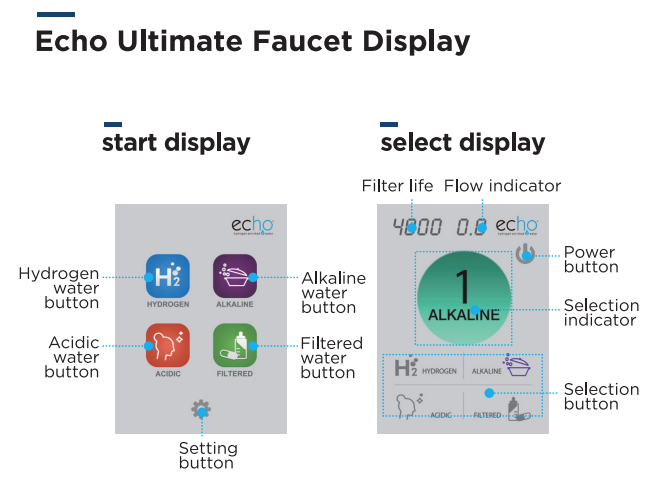
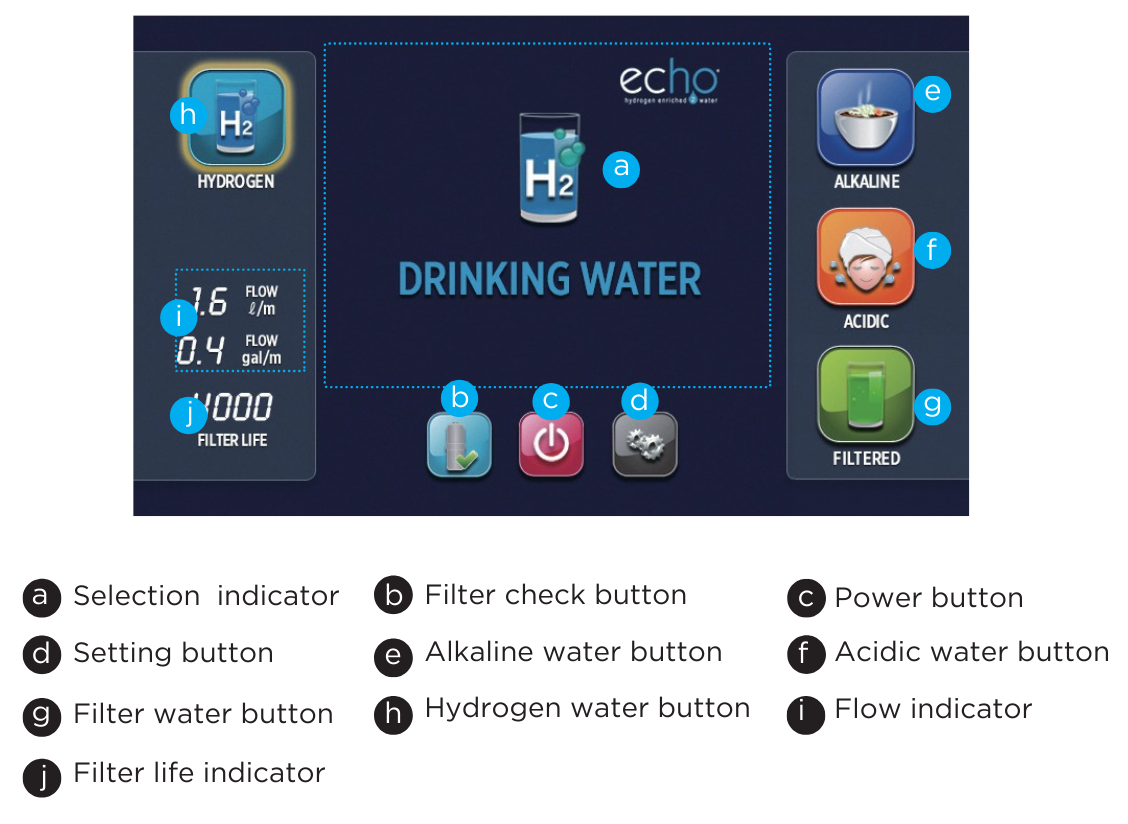
Indicators / Controls
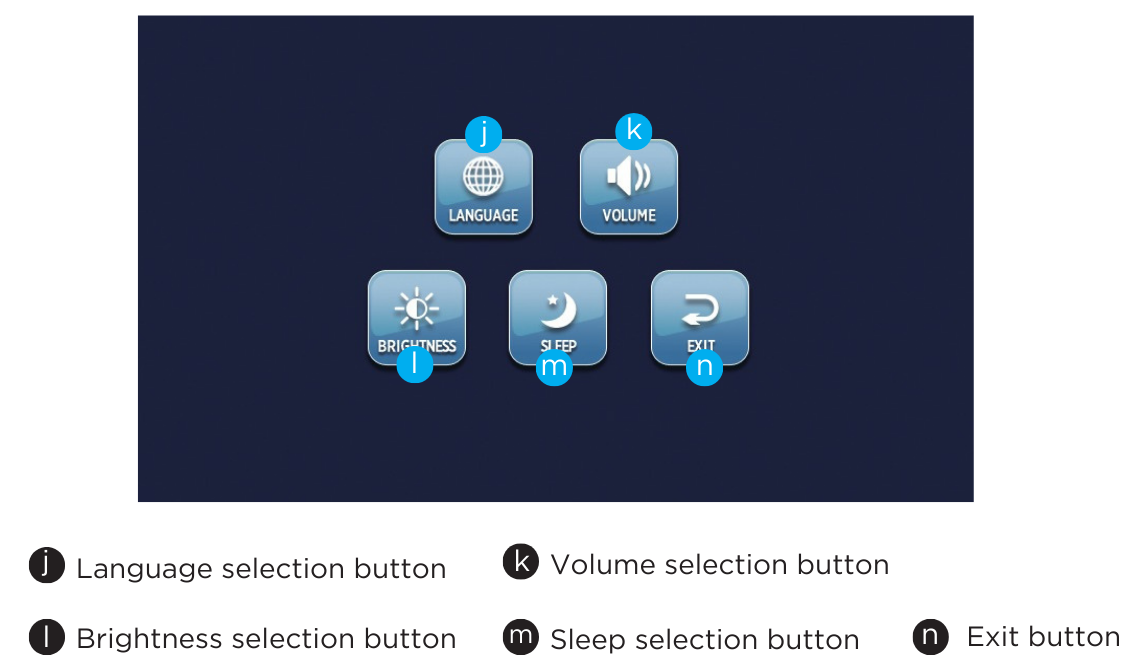
Setting Indicators / Controls
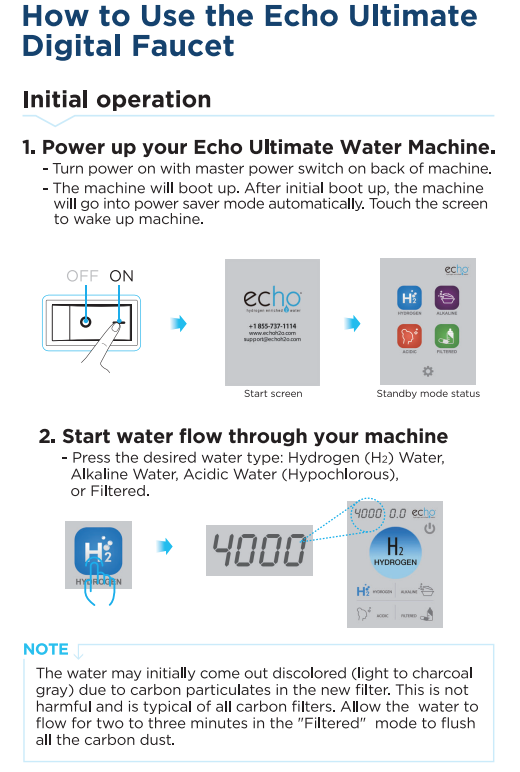
How To Use
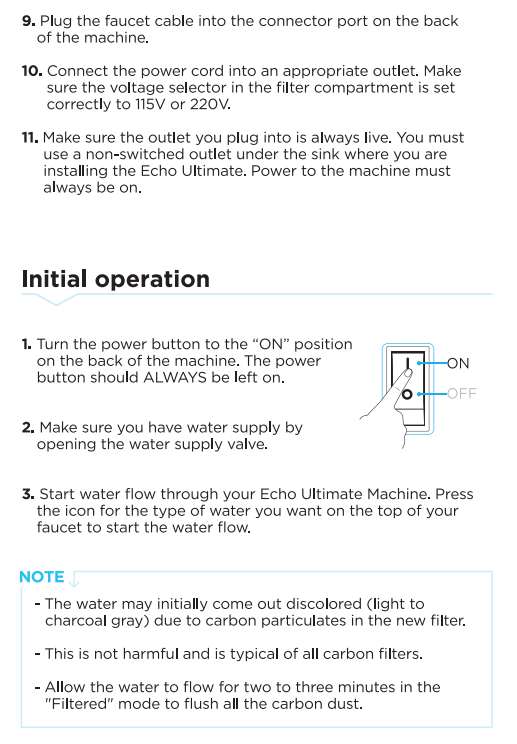
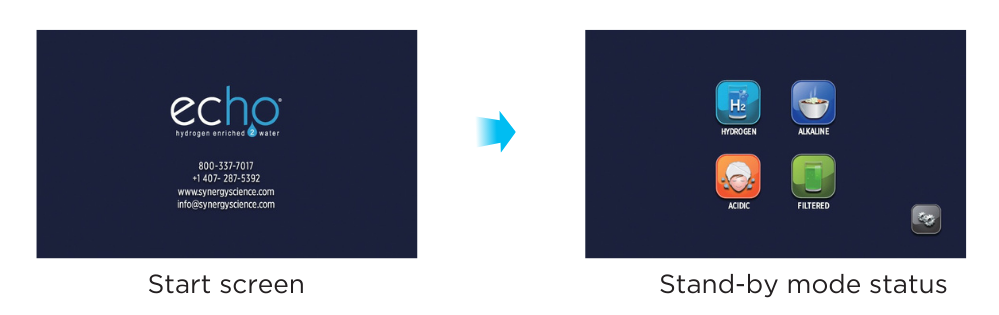
Initial Operation
1. Power up your hydrogen water machine.
-
Turn the power on with the master power switch on the back of the machine.
-
When the machine is not used for a period of time, it automatically goes into power saver mode.
- Touch the screen to take the machine out of “sleep mode.”
2. Start water flow through your machine.
Note:
The water may initially appear discolored (light to charcoal gray) due to carbon particles in the new filter. This is not harmful and is typical of all carbon filters. Allow the water to flow for two to three minutes in the "Filtered" mode, and this will flush out all the carbon dust.
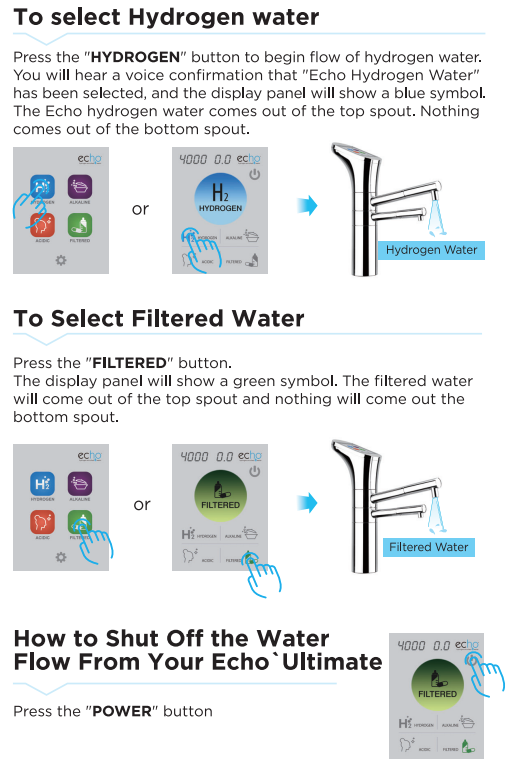
HYDROGEN WATER / FILTERED WATER
When Drinking Hydrogen Water
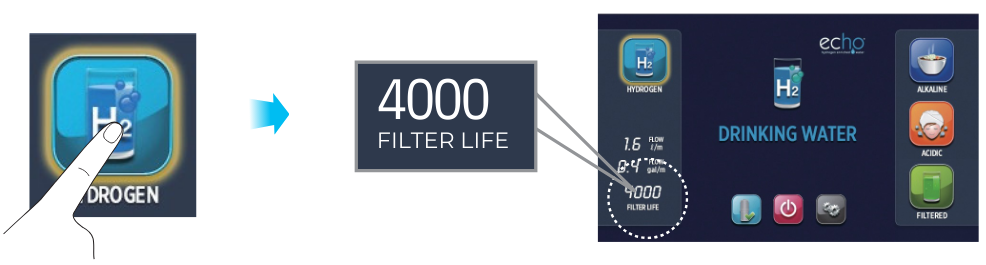
Press the “HYDROGEN” button to begin flow of hydrogen water. You will hear a voice confirmation that "Echo Hydrogen Water" has been selected, and the display panel will show a blue symbol. The Echo hydrogen water comes out of the top spout. Nothing comes out of the bottom spout.

What would I use the hydrogen water for?
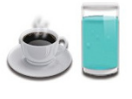
The pH of hydrogen water is neither raised nor lowered and would be the same as your source water. You can use it for both drinking water and taking medications. There are many studies showing the benefits of molecular hydrogen (H2).
When Drinking Filtered Water
Press the "FILTERED" button to begin flow of filtered water. In this mode, electrolysis is not working. You will hear a voice confirmation that “Filtered Water" has been selected, and the display panel will show a green symbol. The echo-filtered water comes out of the top spout. Nothing comes out of the bottom spout.

How to Shut Off the Water Flow From Your Machine
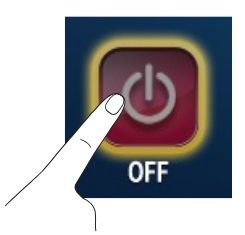
When finished using the machine, press the red power button. The water will stop, and the machine will drain water out of the water cell. After a short time, the display panel will go dark, indicating that the machine is in “sleep mode.”
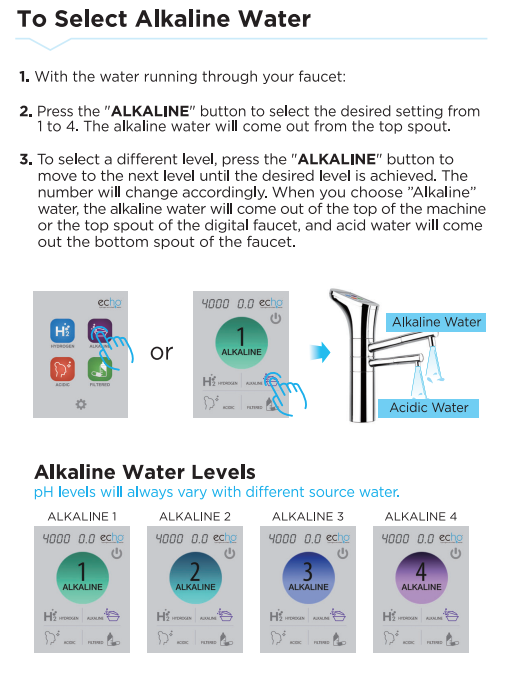
ALKALINE WATER
When Drinking Alkaline Water
Higher than 10pH water is not recommended for drinking for long periods of time.
1. You will hear a voice confirmation that "Alkaline Water" has been selected, and the display panel will show a blue symbol and purple number corresponding to the level selected. Press the "ALKALINE" button to select the desired setting from levels 1 to 4.
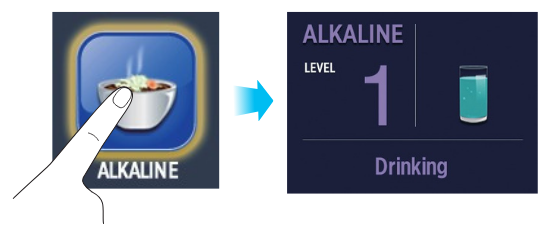
2. Whenever you press alkaline water selection button repeatedly, it changes level of alkaline water.
 Note:
Note:
Your machine will always "remember" the last setting used. If the previous selection was Alkaline Level 2, when you select “Alkaline Water” again, it will automatically produce water at Alkaline Level 2. We do not recommend drinking alkaline water, but some people choose to do so.
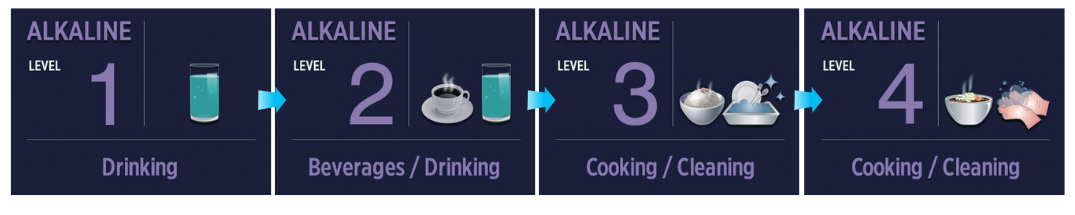
Follow the guidelines below:
Level One: Weak Alkaline Water
pH 8
This level is used for the initial consumption period (4-7 days) for those who drink alkaline water. Let your body adjust slowly to this increase in pH.
|
Level Two: Weak to Medium Alkaline Water
pH 9
After the initial adjustment period, those who drink alkaline water should move up to this level, which they should adjust to for three to four days. Alkaline water drinkers often consume level 2 or 3.
|

Level Three: Medium to Strong Alkaline Water
pH 10
If you choose to drink this level of alkaline water, you may start to detect a strong taste. You may notice calcium buildup on glasses. You can clean it with vinegar. This level can be used for cooking. However, we recommend cooking with filtered water.
|

Level Four: Strong Alkaline water
pH 11
This level is used for deep cleaning things like kitchen counters and washing fresh vegetables. Most people find Level 4 to have a very strong taste. We recommend against drinking water at a 10 pH or higher on a regular basis.
|
Alkaline Level 1 is one pH higher than your source water. Each level of alkaline increases the water's pH by 1 pH higher than the last setting.
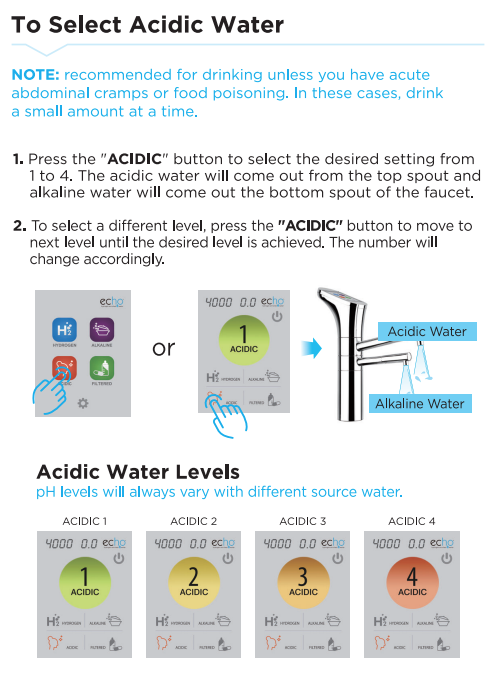
ACID WATER
ACID WATER (Hypochlorous Acid)
Acidic water is not drinking water. Be careful not to drink acidic water, confusing it with alkaline water or hydrogen water.
When Using Acidic Water
Acidic water has many uses, including washing the face, brushing the teeth, as a mouthwash, or washing the body. It is also recommended for cleaning surfaces or creating a natural household cleaner. Level 1 acidic water can irrigate plants and flowers. When using with plants, pay attention to the pH that is best for the plant.
1. Press the "ACIDIC" button to select the desired acid levels from 1 to 4. You will hear a voice confirmation that "Acidic Water" has been selected, and the display panel will show an orange symbol and an orange number corresponding to the level selected.
2. Whenever you press the acidic water selection button repeatedly, the level of acidic water changes. Acid water contains hypochlorous acid, which can be an effective disinfectant. The level of disinfectant is dependent on the ppm of HOCL.
Note: Your machine will always "remember" the last setting used. If the previous selection was Acid Level 2, when you select Acid Water again, it will automatically produce water at Acid Level 2.
Some uses for the different levels of acidic water
Descriptions of acidic water levels. Note: pH levels will vary based on your tap water.

Level One: Weak Acidic Water
pH 6
Facial cleansing. Used for oral hygiene, mouthwash, irrigating flowers and plants, etc.
|

Level Two: Weak to Medium Acidic Water
pH 5
Used for skin care, as an astringent, and oral hygiene, gargling, washing your hair, etc.
|

Level Three: Medium to Strong Acidic Water
pH 4
Used for cleaning in the kitchen.
|

Level Four: Strong Acidic Water
pH 3
Used for sterilization purposes like washing produce, produce, meat, fish, and poultry.
|
The ppm of hypochlorous acid will differ based on the chlorides and chlorine in the source water.
Replacing Your Echo Filter
REPLACING YOUR ECHO FILTER
How to Replace the Filter
IMPORTANT! Stop water flow prior to filter replacement.
1. Stop water flow by turning the power switch on the back side of the product to the OFF position.
2. When the digital filter life indicator displays 0000, or you see the flickering filter symbol, it is time to replace your filter.
3. If you do not replace the filter, the machine will no longer function until you change the filter with a genuine filter.

4. Open the filter door.
Press gently on the indentation on the side of the filter door to open.
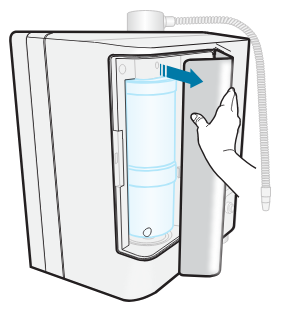
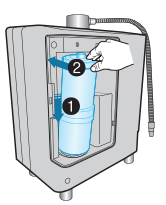
5. Remove the expired filter.
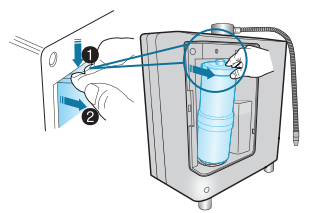
Take hold of the filter securely with your hand, press the top of the filter firmly down against the spring-loaded mechanism (Figure 1) to disengage the top of the filter, and then pull it toward yourself (Figure 2) and up to remove it.
The upper part of the filter is separated from the housing by pressing firmly down. Once you have engaged the spring-loaded mechanism, you can easily remove the filter from the main body by pulling it toward yourself.
6. Insert the new filter into the compartment.
Remove the plastic caps covering both ends of the new filter.
Set the large opening (on the bottom of the filter cartridge) onto the base in the center of the filter cushion. Push the filter down and into the housing compartment, ensuring that the opening at the top of the filter is seated properly into the fitting at the top of the housing.
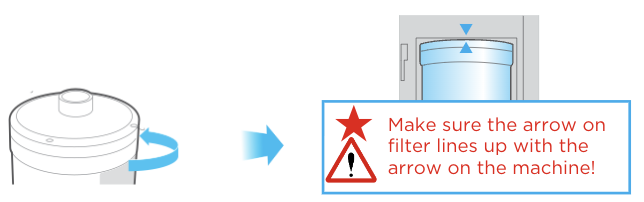
7. Once the new filter is installed, rotate the filter until the arrow on the filter is aligned with the arrow on the machine.
Your Echo® filter is equipped with a genomic chip. This chip communicates with the machine how much water has flowed through the filter.
8. The filter life indicator will automatically reset once the machine detects a new filter present.
Check for leaks by running water through your machine before replacing the housing cover.
9. Flush out the carbon dust.
The water flowing through will initially appear discolored (light to charcoal gray) due to carbon particulates in the new filter. This is not harmful.
Allow the water to flow for two to three minutes in the "Filtered" mode to flush out all the carbon dust.
10. Replace the filter door.
COMPOSITION OF FILTER
High-Performance Carbon Filter
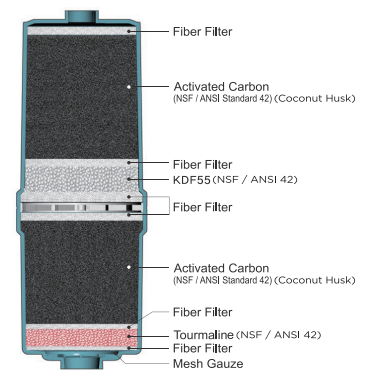
High-Performance Carbon Filter
The effective period of filter use may differ greatly depending on the season, usage, and environment (i.e., water pressure, quality of source water, and amount of use).
Please replace the filter when prompted by the machine or if any of the following occur:
- The water no longer tastes clean.
- Your machine has not been in use for a month or more.
Cleaning
CLEANING CARTRIDGE INSTRUCTIONS
-
Remove the main TAG filter: Detach the main TAG filter and set it aside in a container to prevent leaks.
-
Install the cleaning cartridge: Insert the cleaning cartridge in place of the main TAG filter.
-
Run each water setting:
- Run the unit on each water setting (H2, alkaline, acidic, and filtered) for at least 10 seconds per setting.
- This ensures the cleaning solution circulates through all water pathways.
-
Turn off the unit: Once all settings have been run, turn the unit off and let it sit overnight for thorough cleaning.
-
Reinstall the main TAG filter: After cleaning, replace the cleaning cartridge with the main TAG filter.
-
Flush the unit:
- Run water through the machine for 30 seconds on each setting (H2, alkaline, acidic, and filtered) to ensure all cleaning solution residue is thoroughly removed.
Special Note:
If the unit displays a "Non-authentic filter" message during the process:
- Turn the unit off and back on, then attempt to change the setting again.
- If the message persists, install the Main TAG filter temporarily to allow the unit to recognize an authentic filter and clear the error message.
- Once resolved, remove the Main TAG filter and reinstall the cleaning cartridge to complete the cleaning process
MEASURING THE PH OF WATER
Important Note
Water quality and mineral content vary greatly in different Iocations and will directly impact machine performance with respect to pH and hypochlorous acid production.
 |
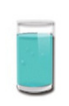
Fill the test container provided about 1/2 full with alkaline, acidic,filtered water or H2 water. |
 |
Add two or three drops of the pH reagent into the container and stir.
If the reagent and water are not mixed well, an incorrect reading may occur.
|
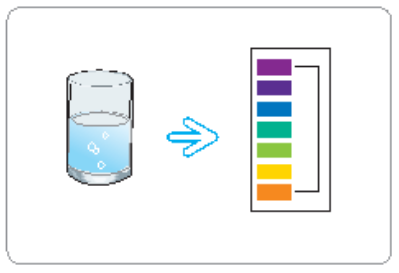 |
The pH value is determined by matching the color of the water to the pH color chart provided. A digital pH meter is more accurate than reagent. |
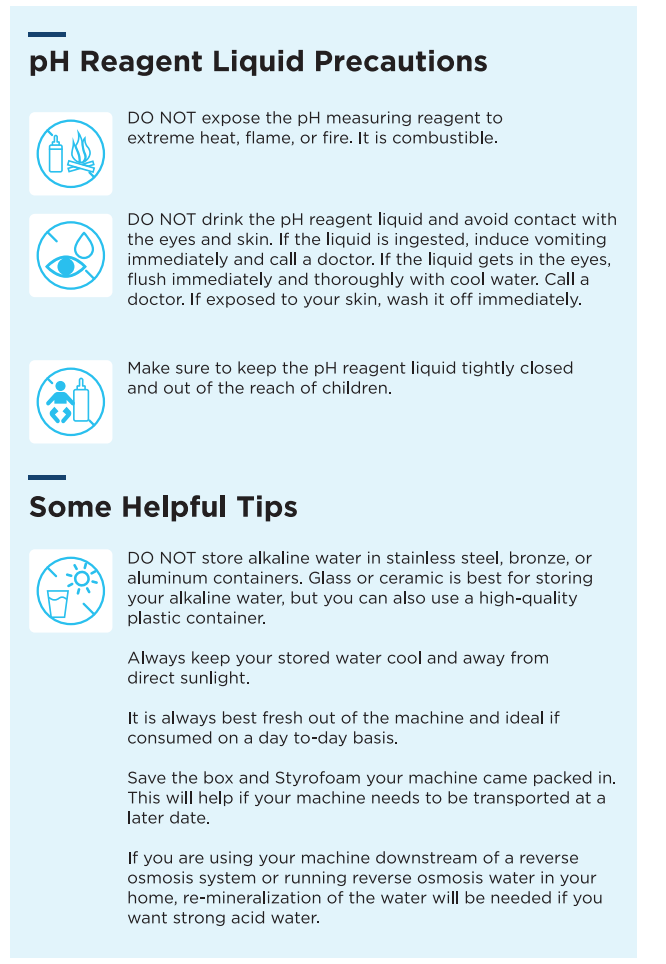
CAUTION
- DO NOT consume a water-containing pH reagent.
- Keep the pH reagent Iiquid and color chart away from open flames!
-
If the liquid comes in contact with the eyes, flush liberally with fresh water and seek medical help.
- If ingested, induce vomiting and seek medical help.


