Setup

INITIAL SETUP
Initial Setup for Your Echo Flask™
Let’s get your Echo Flask™ ready to shine! A quick clean and a little hydration prep will ensure it's perfectly primed for peak hydrogen performance. Here’s everything you need to know to start strong:
Cleaning the Inside of Your Flask (Before First Use)
To make sure your flask is fresh and ready for drinking:
-
Wash the inside of the bottle with mild dish soap and warm filtered water.
-
For a deeper clean, you can use a 50/50 mix of white vinegar and filtered water—this adds a bit of extra sterilization power.
-
Important: Never use harsh chemicals or abrasive cleaners.
-
Rinse thoroughly to ensure there’s no soap or vinegar residue left behind.
Cleaning the Outside of Your Flask
Keep it simple and gentle:
-
Use a damp cloth to carefully wipe down the outside.
-
Be sure to avoid getting any moisture near the charging or USB ports.
-
Do not submerge the flask or put it in the dishwasher—this can damage the electrical components.
Why Is There Water Inside?
You might notice a small amount of distilled water inside the flask when it arrives—that’s totally intentional! It helps preserve the inner membranes during shipment to ensure top performance.
If Your Flask Arrives Dry—No Worries!
Sometimes the internal membranes arrive dry, which just means your flask needs a little rehydration love:
-
Fill your bottle with non-chlorinated water.
-
Let it sit for 48 hours to allow the internal membranes to fully hydrate.
-
You may see large sporadic bubbles at first—this will smooth into a fine mist of bubbles as the system reactivates.
It may take up to one week of regular use for your flask to build full pressure and produce consistent hydrogen bubbles.
If things still seem off after a week, our team is happy to help! Just email us at support@echowater.com.
Pro Tip: Accelerate the Hydrogenation Process
If your flask is new, hasn’t been used in a while, or was stored dry, here’s how to jumpstart the hydration process:
-
Soak the inside of the flask with hot (not boiling) filtered water overnight. (Do not submerge the entire device.)
-
Run a cleaning cycle, discard the filtered water, then refill with filtered water.
-
Resume everyday use—your flask will now be well on its way to peak hydrogen performance!
Remember: Progress is a good sign! A steady improvement in bubble flow means your Echo Flask™ is working precisely as it should.
Operating

OPERATING THE ECHO FLASK™
1. Removing the Lid
The lid on your new product may feel a bit snug at first, but this is normal and will loosen over time as it breaks in.
-
-
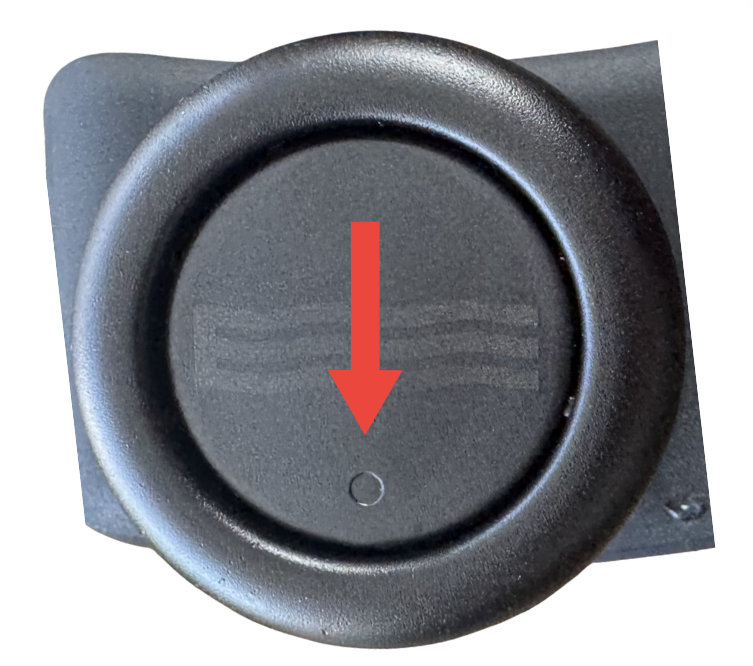
Before opening your flask, always release the pressure first! Find the cap's top, locate the circle, and press straight down on that area. Pressing the middle or the opposite side will not release the pressure correctly.
-
At the end of a cycle, when you press the release button on the cap, you may experience different sounds depending on how much pressure remains:
-
No sound: Most or all pressure was already released during the cycle.
-
Soft hiss or loud pop: Some pressure may still be present—both sounds are normal and safe. The intensity of pressurization sounds can be affected by several factors, including the type of water, water temperature, altitude, and even barometric pressure.
Seeing bubbles rise to the top during the cycle? That’s a great sign your Flask is working properly!
NOTE: Refer to Pressurization Troubleshooting if you do not hear a pressurization release.
-
To open your flask safely, gently push down on the lid and twist it counterclockwise to unlock. The lid is specially designed to “lock” into place as internal pressure builds—kind of like a child-proof medication bottle—so you’ll need to apply a little downward pressure while twisting to release it. It’s all part of keeping things secure while your flask does its thing!
NOTE: Please avoid placing your fingers under the lid when twisting it open, as the bottom edge can feel slightly pointed and could cause injury. Instead, we recommend gripping the sides of the lid securely as you twist. This makes opening your flask both safe and comfortable!
-
The lid will become easier to handle and open with use, ensuring a smooth, enjoyable experience!
🎥 Helpful Video
- How to Remove the Lid (2:32)
- How to Remove the Gasket/Seal (0:39)
- How to Properly Reinsert the Gasket/Seal (1:04)
- How to Put the Lid Back On (2:18)
2. Fill the Flask
- For optimal performance, use filtered, distilled, or reverse osmosis water. Avoid tap water, as its high mineral content can lead to buildup and reduced performance.
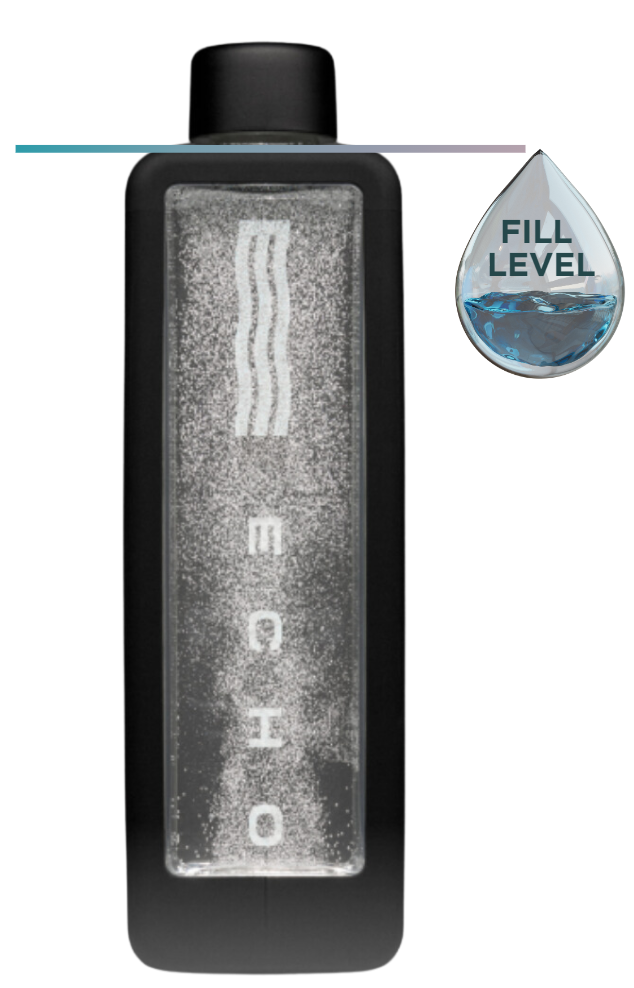
- Fill the bottle to the top of its shoulder (no liquid should be visible in the spout).
3. Seal the Lid
- Apply downward pressure while twisting the lid to close it to the right.
- You can secure the cap before starting a cycle (please make sure the lid is securely tightened, with the logo positioned perpendicular or horizontal to the flask). You may feel some resistance in the lid when closing; however, you must continue to twist until you hear a "click." This will ensure the lid is in position.
NOTE: The lid on your flask features a unique design that differs slightly from traditional screw- or threaded-lids. Instead, it features tabs inside—kind of like a pressure cooker—that “lock” into place as pressure builds up.
4. Activate Hydrogen Generation
- Wake the Touch Screen: Tap the screen to activate the display.
- Unlock the Interface: Swipe up on the screen.
- Start Hydrogenation: Press the play button to initiate a 10-minute cycle (default setting).
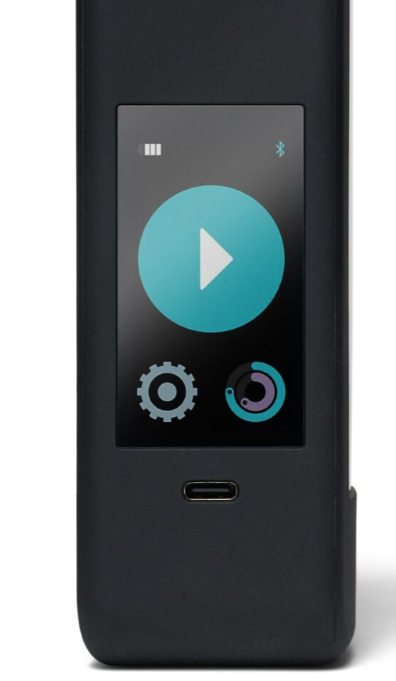
- Tap the "+ or—" options on the timer to lengthen or shorten the cycle duration. Each tap increases or decreases the duration by 1 minute.
- Auto-Lock Feature: If no adjustments are made, the screen locks automatically after 3 seconds. Swipe up to unlock.
5. Cycle Completion
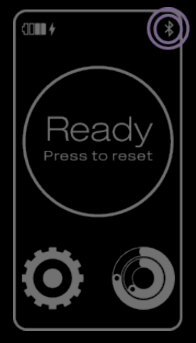
- At the end of the cycle, the flask will display a “Ready” message.
Note: If you would like alerts on your device, you can adjust the sound settings in the Echo Water app.
6. Stopping a Cycle Early
You can stop a cycle in two ways:
- Tap the “–” button below the cycle time repeatedly until it reaches 0.
- Or, press the pause button, then tap the gear icon and select "Power Off" to end the cycle and put the flask to sleep.
Note: Cycles stopped before reaching 2 minutes will not count toward your drinking goals in the Echo Water app.
To shorten a cycle before it begins, simply tap the time display to decrease it by one-minute intervals.
7. During & After A Cycle
-
Your cap features a built-in safety feature that automatically releases pressure during the hydrogenation cycle. When this happens, you might hear a gentle fizzing or crackling sound—this is entirely normal and indicates that your Flask is functioning as designed.
-
Before opening your flask, always release the pressure first! Find the cap's top, locate the circle-marked spot, and press straight down on that area. Pressing the middle or the opposite side will not release the pressure correctly.
-
At the end of a cycle, when you press the release button on the cap, you may experience different sounds depending on how much pressure remains:
-
No sound: Most or all pressure was already released during the cycle.
-
Soft hiss or loud pop: Some pressure may still be present—both sounds are normal and safe. The intensity of pressurization sounds can be affected by several factors, including the type of water, water temperature, altitude, and even barometric pressure.
Seeing bubbles rise to the top during the cycle? That’s a great sign your Flask is working correctly!
NOTE: Refer to Pressurization Troubleshooting if you do not hear a pressurization release.
-
To open your flask safely, gently push down on the lid and twist it counterclockwise to unlock. The lid is specially designed to “lock” into place as internal pressure builds—kind of like a child-proof medication bottle—so you’ll need to apply a little downward pressure while twisting to release it. It’s all part of keeping things secure while your flask does its thing!
NOTE: For your safety, please avoid placing your fingers underneath the lid while twisting it open, as the bottom edge can feel slightly pointed. Instead, we recommend gripping the sides of the lid securely as you twist. This makes opening your flask both safe and comfortable!
-
The lid will become easier to handle and open with use, ensuring a smooth, enjoyable experience!
NOTE: If you are experiencing leaks, please refer to the Leaks troubleshooting section.
Charging

CHARGING
1. Identify When Charging Is Needed
- The battery icon in the top left corner of the screen indicates charging is needed by gradually losing bars and changing color from green to yellow to red.
- When your flask needs charging, you will receive a battery advisory message on the touchscreen. Once you receive this message, you can still run up to 1-2 10-minute cycles before the hydrogenation function is interrupted.
2. Locate the Charging Port
- The USB-C charging port is located under the display screen.
3. Connect the Charger
- Plug the USB-C cable into the generator's port.
- Connect the other USB-C end of the cable to a 5V—2A charger block and plug it into a wall outlet. If your Echo Water charging block is not available, any USB-C charging block will work.
4. Monitor Charging Progress
-
If the screen is locked, the display will show a flashing battery icon while the unit charges. Once charging is complete, the icon will display four full bars and stop flashing.
-
If the screen is unlocked, a lightning bolt will appear next to the battery icon in the top left corner to indicate charging. When fully charged, the battery icon will display four full bars, and the lightning bolt will remain visible while the device is plugged in.
5. Unplug the Device After Charging
- Unplug the Echo Flask™ when charging is complete to avoid potential battery damage or overheating, which could harm the device, melt the cord, or pose a fire risk.
Warranty Note: The charging cord, box, and device battery are not covered under warranty. Follow proper charging practices to ensure longevity. If you need a replacement charging cord or block, any aftermarket USB-C-to-USB-C cord or block will work.
NOTE: If you suspect that your battery is draining quickly, please refer to the Battery, Charging, and/or Power Issues troubleshooting section.
Cleanin

CLEANING & MAINTENANCE
Regular cleaning is essential to keep your Echo Flask™ running at its best and lasting for years of hydration bliss. To make it easy, I’ve got some helpful resources that break it all down perfectly.
Inside of the Flask:
- Bottle (Weekly): Wash with mild soap and filtered water. No harsh chemicals. Rinse thoroughly with warm filtered water to ensure that all mild soap residues are completely removed from your bottle & generator.
- H2 Generator (Monthly - to remove mineral buildup - descaling): Fill with 1/3 vinegar and 2/3 warm distilled water. Run the "Clean Flask" cycle from the settings menu. Rinse thoroughly when complete.
Outside of the Flask:
-
Hand wash only with a damp cloth, ensuring no moisture enters the device's electrical ports. Do not put in the dishwasher or submerge in water.
Cap Care
-
Protect the Pressure Release Valve: Avoid submerging the cap, as water may seep in and damage the pressure release valve.

-
Do not use tools or devices to pry your cap open; this may cause scratches or other damage, which will not be covered under warranty.
Note: Never Use a Dishwasher: Placing Echo products in the dishwasher will cause damage, which is not covered under warranty.

Deep Cleaning & Descaling Instructions
1. Prepare the Cleaning Solution
- Mix 1 part white vinegar or citric acid (powder or liquid) with 3 parts filtered water.
2. Run a Cleaning Cycle
- Pour the cleaning solution into your Echo Water bottle.
- Run 1 cycle to pull the solution into the generator.
3. Final Rinse
- Discard the cleaning solution and rinse the flask thoroughly with warm, filtered water.
- Fill the flask with fresh, clean filtered water and run a 5–10 minute cycle to flush out any remaining cleaning solution. Discard the filtered water after the cycle.
Cleaning the Gasket
- Please use tweezers carefully to remove the gray gasket from the lid, avoiding punctures.
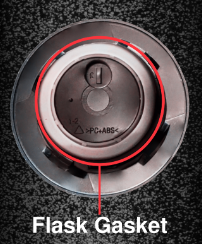
- Please make sure that the gasket and surrounding areas are clean of debris.
- Reinsert the gasket into the lid, ensuring the "line" side faces inward as you reposition it.
Your Echo Flask™ is now clean and ready for regular use!
Technology

ECHO FLASK™ TECHNOLOGY
Echo Flask™ Settings and Tracking Features
Light/Dark Mode
- Description: Switch between light and dark display modes through the settings menu.
- Benefits: Customize the interface to suit your lighting preferences.
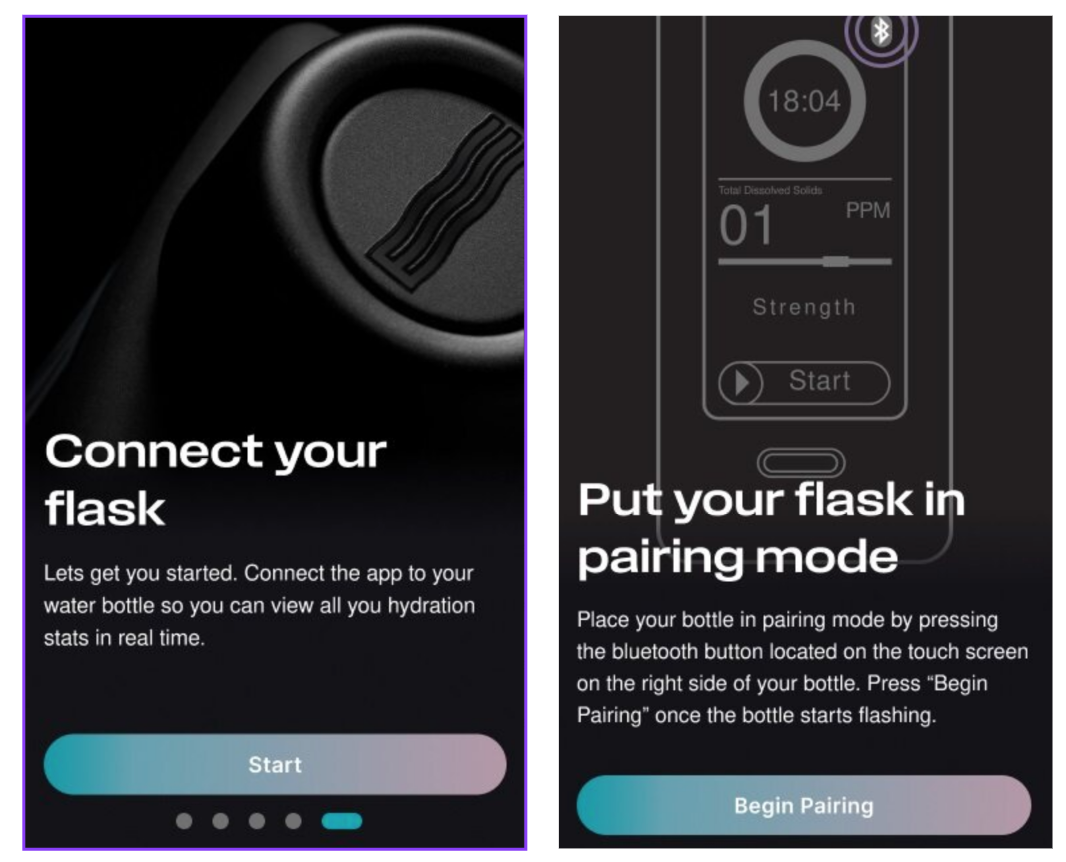
Bluetooth Pairing
Connect or disconnect your flask from the Echo Water App.
- Press the Bluetooth button on the touchscreen to enter pairing mode.
- Press "Begin Pairing" in the app once the bottle starts flashing.
- Pairing instructions and QR codes are also included in the packaging.
Benefits: Enables syncing with the Echo Water app for advanced tracking and control.
Cleaning Mode
- Description: Run a cleaning cycle. For more detailed instructions, refer to the Cleaning & Maintenance section of this manual.
- Benefits: Keeps the generator clean and performing optimally. This does not replace the standard cleaning and maintenance of your bottle. You must still clean the inside of your bottle, cap, and gasket to avoid mildew or other issues.

Power Off (Sleep Mode)
The Power Off option lets you manually stop a generation cycle and return the flask to the home screen via the settings menu. However, selecting Power Off does not entirely turn off the flask. Instead, the device will remain on the home screen until it automatically enters Sleep Mode after a period of inactivity. The flask will only fully power down when the battery is depleted.
Benefits:
-
Conserves Battery Life: Reduces power consumption when the flask is not in use.
-
Prevents Unnecessary Operation: Ensures the flask does not continue running an active cycle when not needed.
-
Easy Reactivation: The flask can quickly resume operation when needed without requiring a full restart.
1. To activate Power Off, navigate to the settings menu by clicking the gear icon.

2. Select the "Power Off" option. The screen will automatically return to the swipe screen before entering sleep mode.
Tracking Your Goals
Molecular Hydrogen
- Description: Tracks hydrogen generated, measured in milligrams (mg). 1 PPM equals 1 milligram (mg) of hydrogen per liter (L) of water
- With Pairing: View detailed stats in the app for more precise monitoring.
Hydrogen Cycles
- Description: Logs the total number of hydrogenation cycles completed.
- With Pairing: See the cycle history and trends over time.
Water Consumption
- Description: Measures the total water consumed in ounces (oz).
-
With Pairing: Set hydration goals and monitor progress through the app.

Usage Streak
- Description: Tracks consecutive days of flask use to encourage consistency.
- With Pairing: Receive streak reminders and motivational badges in the app.
WARRANTY
FAQ's
Why are my Flask's bubbles large?
During the initial breaking in of your flask, your bubble's may be getting caught and collecting on the grate that protects the electrode plate. Consistent use will break apart larger bubbles.
What is hydrogen water good for?
Echo Hydrogen Water offers the wellness benefits associated with antioxidants, including support for natural energy, mental clarity, and overall wellness. There are over 1250 studies exploring the potential wellness benefits of hydrogen-enriched water. Read more about the research here.
Does hydrogen water ‘detox’?
Hydrogen water has antioxidant properties that may have a detox-like effect, supporting the body’s natural processes in managing exposure to environmental elements like pollution. Particulate matter can impact wellness, so staying hydrated with hydrogen-enriched water may help support your body’s natural defenses.
What is the shelf life of hydrogen water?
Hydrogen water will last in an unopened Echo Go+ bottle for up to 10 hours. Hydrogen is the smallest element in the universe (so small that 4 billion atoms lined up in a row would fit on the head of a pin!), so you cannot keep it contained for very long.
FAQ's Cont.
How do I know if the lid is sealed?
The logo on the lid should be horizontal or perpendicular to the body of the flask. If the logo is diagonal, it is not sealed. The lid may be harder to turn in the beginning and will need a breaking in period.
How often should I drink hydrogen water?
There is no standard recommendation for how much hydrogen water to drink. Some studies have explored using doses of 1-3 liters per day. With the Echo Go+, many users enjoy drinking at least 3 bottles a day, spread throughout the day. For personalized advice, it’s best to consult with a healthcare professional based on individual health needs.
What does hydrogen water taste like?
The addition of hydrogen into water does not add or change the taste. Water generally only has a taste due to contaminants like chemicals, metals, or minerals. Echo Water™ Machines with built-in filtration remove these contaminants, producing clean hydrogen water. Many customers appreciate the pure taste of filtered hydrogen water.
Can hydrogen water support weight management?
Research on hydrogen water is ongoing, and some studies suggest it may support wellness efforts, including energy levels and overall vitality, which could complement a balanced approach to weight management.


